Pages

Recently Viewed

Saturday, May 12, 2012

UNIX commands.....

1) zip and unzip : zip <file_name>.zip <file_required_to_zip>
                         $_Test>zip test.zip ls *.*   It will zip all files available at location and create test.zip file

2) Softt link Creation :  ln -s $FND_TOP/bin/fndcsper <filename>

3) Execute the enviornment script : . ./*.env

Set Enviornment Variable in Unix Server

Purpose - To set enviornment variable on unix server (for example Product_TOP and custom_TOP ).

Enviornment Variable - is the shell  script needs to run and assign the corrosponding path to variables.

How to Set -
 >> Login to unix server
 >>  locate  *.env
 >>  execute the *.env script

Default Location : /oracle/ebs/apps/apps_st/appl

File Name Format : $DBserviceName_$InstanceName.env ( * File name can be anything)
Command -
To set the enviornment variable = . ./XXXXX.env 
To validate the enviornment variable = echo $XXX_TOP


Wednesday, April 4, 2012

Desktop Integrator - A webADI Introduction

Introduction :
For single records transaction Oracle suggest to use the application and
provides open interface and public APIs for bulk transaction.
webADI is another strong feature provided by Oracle for bulk operations,
which allows user to provide input in MS application (Word or Excel..etc).


Why WebADI ? :
It requires technical expertise for both interface and API usages.
For interface user should know to insert all transactional data into interface table and API needs transactional data to be imported in any portable format to server.
WebADI does not have such technical dependency as it is available to user as function and Launch desktop integrator (Excel) to feed transactional data.
This provides reporting option also.


How It works :
        For this one interface package required to do  initial validations.
Post it we can use any of options -   
1) Either insert all data into Interface Tables and run the Import
    Program Manually
2) Call API inside the interface program and do transactions directly  


Components  :  
1) Integrator  - Basic definition and includes user name, internal
                       name and application name
2) Interface   -  Most Important section , which directs data to flow (can
                       be either of Table or Procedure/Function type)
3) Content  -    This is required if webADI is being used for reporting
                       purpose also
4)  Upload    -   Controls the upload options
5)  Importer –  Definition of import options
6)  Layout  -     Attributes arrangement on excel


Tuesday, April 3, 2012

Enable/Disable Concurrent Program Parameters

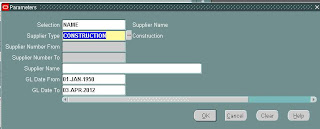
Requirement - Business need is to have multiple parameters but end user will be allowed to use one at a time. selection of any parameter, should disable others.  

Solution - Below is one possible option which provides the same behavior in other way.
This requires one additional parameter as Selection/Choice which will decide the enabled parameter.

There will be as many dummy (non displayed) parameters as required parameters in program. actual parameters will be dependent on respective dummy parameters.

Dummy parameters will be dependent on selection parameters and hold values based on selection.

Example - User requires 2 parameters supplier number and name to be available on one report and only one should be selected at time. So the requirement was to make other disable. dependent parameters has limitations and it cannot flow bottom to top. we can achieve this by introducing one selection parameter, which can hold 2 values -
1)      Name – Supplier Name
2)      Number – Supplier Number

Initially both Supplier Number and Name range parameter will be disabled.


Selection = Name , will enable supplier Name parameter range.


Selection = Number , will enable supplier Number parameter range.


Implementation – Create 3 dummy parameter (1 displayable and 2 non displayable).
           
Parameter
Value Set
Enable
Display
Test1
VS0
Y
Y
Test2
VS1
Y
N
Test3
VS2
Y
N


Value Set - VS0, will hold below values

Parameter Test2 and Test3 :
 

Default Value  select decode(:$FLEX$.VS0,'NUMBER','Y',NULL) from dual

Test3 will have similar definition.
Value Set =  VS2
Default Value  select decode(:$FLEX$.VS0,'NAME','Y',NULL) from dual

Now include the below condition for Number and Supplier Value set definition –
Supplier Number Value set  -   :$FLEX$.VS1='Y'
Supplier Name Value set     -   :$FLEX$.VS2='Y'


Wednesday, February 29, 2012

Assign Responsibility using database

Requirement – To assign any responsibility to a fnd user using database. This is useful if we does not have sysadmin responsibility.

Solution  - Following API can be used to assign any responsibility to a user
  fnd_user_resp_groups_api.Insert_Assignment
                                    ( user_id                                   =>ln_user_id,
                                    responsibility_id                      => c1.responsibility_id,
                                    responsibility_application_id =>c1.responsibility_application_id,
                                    start_date                               =>SYSDATE,
                                    end_date                                 =>SYSDATE+1,
                                    description                              =>'null');


Example – Assign system administrator responsibility to user sandeep

DECLARE
  ln_user_id      NUMBER;

  CURSOR curr_add_resp
  is
    SELECT distinct responsibility_id,
      responsibility_application_id,
      security_group_id
    from fnd_user_resp_groups
    WHERE responsibility_id IN
      (SELECT responsibility_id
      from fnd_responsibility_vl
      WHERE responsibility_name IN ('System Administrator','Functional Administrator')
      )  
  ;
BEGIN  
              /* Fetch user id for fnd user */
              SELECT user_id
              INTO ln_user_id
              FROM fnd_user
              WHERE user_name='SKP';
             
              /*Responsibility Assignments */
              FOR c1 IN  curr_add_resp LOOP
                        BEGIN
                          fnd_user_resp_groups_api.Insert_Assignment
                                                            ( user_id =>ln_user_id,
                                                            responsibility_id => c1.responsibility_id,
                                                            responsibility_application_id =>c1.responsibility_application_id,
                                                            start_date =>sysdate,
                                                            end_date =>SYSDATE+100,
                                                            description =>'null');
                        EXCEPTION
                        WHEN OTHERS THEN
                          dbms_output.put_line('Error in Responsibility Assignment'||SQLERRM);
                        END;
               END LOOP;
EXCEPTION
    WHEN OTHERS THEN
    dbms_output.put_line('Error in Responsibility Assignment'||SQLERRM);
END;   


Create FNDUSER From database

Requirement – To create FNDUSER without having access to application.


Solution  - Following API can be used to create a FND USER.
fnd_user_pkg.createuser
                                    ( x_user_name =>lv_user_name,
                                      x_owner        =>lv_owner,
                                      x_unencrypted_password     =>lv_password );


Example – create FNDUSER “Sandeep” using database.
DECLARE
  lv_user_name    VARCHAR2(100):= 'SANDEEP';
  lv_owner        VARCHAR2(10) := 'CUST';
  lv_password     VARCHAR2(20) := 'sandeep'; 
 ln_user_id         NUMBER;
BEGIN
  /*Create FND User*/ 
    fnd_user_pkg.createuser
                                    ( x_user_name                                                =>lv_user_name,
                                      x_owner                                                        =>lv_owner,
                                      x_unencrypted_password                             =>lv_password
                        );
    BEGIN
                          SELECT user_id
                          INTO ln_user_id
                          FROM fnd_user
                          WHERE user_name=lv_user_name;  
    EXCEPTION
                        WHEN no_data_found THEN
                          dbms_output.put_line('Did not create user('||lv_user_name||') : '||sqlerrm);
    END;
    IF ln_user_id IS NOT NULL THEN
      dbms_output.put_line('Successfully created user : '||lv_user_name);
      dbms_output.put_line('user id = '||ln_user_id);
    END IF;
EXCEPTION
    WHEN OTHERS THEN
    dbms_output.put_line('Error in  Create user :'||lv_user_name||'>>'||SQLERRM);
END;


Friday, February 17, 2012

Upload/Download Workflow (wft) Files

Requirement -  Upload wft files to database or download the latest wft file from database

Solution -  Workflow files (with extension .wft) are being stored in database and it can be upload (to) or download (from) database using below 2 methods.
1)      Standard Concurrent Program  
2)      WFLOAD Utility


Standard Concurrent Program – Run the program Workflow Definitions Loader using sysadmin responsibility (you can add this program to any of responsibility and run from there).
This program has 3 parameters as below
1)      Mode – Upload/Download
2)      File - /staging/sandeep/Project/PAPROWF.wft 
                  (wft file name with Full Path. Make sure file is available at given path for UPLOAD Mode)
3)      Item Type – Item type Name for above file (This can be get from workflow builder. Open your wft file in workflow builder and create any process. The first attribute will be Item Type Name)
4)   
    
WFLOAD Utility – similar to FNDLOAD utility used for LDT files, oracle has provided WFLOAD  for workflow files. Below are the available options -
To upgrade      - WFLOAD apps/pwd 0 Y UPGRADE filename.wft
To upload        - WFLOAD apps/pwd 0 Y UPLOAD filename.wft
To force           - WFLOAD apps/pwd 0 Y FORCE filename.wft
To download   - WFLOAD apps/pwd 0 Y DOWNLOAD filename.wft ITEMTYPE1 [ITEMTYPE2 ... ITEMTYPEN]


Add Concurrent Program to Request Group Using Database

Requirement – Need to register custom concurrent program to request group without having system administrator responsibility

Solution – We can use below script to add custom program to respective request group  

DECLARE
BEGIN
FND_PROGRAM.add_to_group
(
 PROGRAM_SHORT_NAME =>'XX_MANAGERS'       
,PROGRAM_APPLICATION =>'AR'                             
,REQUEST_GROUP => 'Receivables All'
,GROUP_APPLICATION =>'AR'
) ;

COMMIT;

EXCEPTION
WHEN OTHERS THEN
dbms_output.put_line('Object already exists');
END ;
/

Tuesday, January 31, 2012

Multiple Error Messages in OAF

Requirement – How to raise multiple error messages as multiline on OAF pages.

Solution –  1) Create and initialize new ArrayList object
       2) Define the error messages in array list
       3) Raise bundled eception method  

Example -
    ArrayList  errMsg = New ArrayList();                 
 
    errMsg.add(new OAException("Who is Lucifer"));
    errMsg.add(new OAException("Ra-One will kill Lucifer"));
    errMsg.add(new OAException("G-One is protector"));      
    
   OAException.raiseBundledOAException(errMsg);    

Output –
1.       Who is Lucifer
2.       Ra-One will kill Lucifer
3.       G-One is protector
------------------------------------------------------------------------------------------------------
Exception -  If above method is being implemented inside a try/catch block, It might not throw expected error message.So either implement above outside Try/catch block or use below steps to handle this inside try/catch.       
             
1)      Create array list object at global level
      ArrayList  errMsg = New ArrayList();     
            
2)      Define the messages inside the try block and raise exception with custom message
 try {
    errMsg.add(new OAException("Who is Lucifer"));
    errMsg.add(new OAException("Ra-One will kill Lucifer"));
    errMsg.add(new OAException("G-One is protector"));      
    throw new OAException("Sandeep");   
     }           

3)      Handle this implementation inside the catch block
catch(Exception e)
  {
  String a="oracle.apps.fnd.framework.OAException: Sandeep";
  if (a.equals(e.toString()))
  {   OAException.raiseBundledOAException(errMsg);    }
  else
  {   throw new OAException("Exception Has been found in code 28:" +e, OAException.INFORMATION); 
 }

Raise Exception in OAF

Requirement – How to raise and handle exceptions in OAF pages.

Solution – There are 3 types of exceptions can be thrown on OAF pages (java).
a)      Warning  – This will display as warning and show custom message  
b)      Information  - This will display as information and show custom message
c)       Error – This will display your custom message as error and stop the flow.

In java (OAF) we use try catch block to handle exceptions.
Try Block – All logic should be kept in a try block to handle exceptions
Catch Block – Once control find any exception in try block, it goes to catch block. Catch block will be used to handle the raised exception.

Example -
try{ 
                                custom code{
……………;
…………….;
}   
  
throw new OAException("Sandeep");     // Raise Exception Manually     

                      }catch(Exception e)
                     {

                 throw new OAException("Exception " +e,  OAException.WARNING);         
                // For Warning Message
                 throw new OAException("Exception " +e,  OAException.INFORMATION);   
                // For Information Message   
                 throw new OAException("Exception " +e,  OAException.ERROR);             
               // For Error Message 
     }

If exception occurs in custom code, control will come to catch block and it will print the relative exception message on the screen.
If there is no exception in custom code, control will read last line. Which is to throw exception manually and send control to catch block.
Error message in this case will be as “Exception oracle.apps.fnd.framework.OAException: Sandeep”